Roadmap to the Universe - Part II - Control

The Plan

I picked Stellarium to control my Celestron NexStart 6SE.

Stellarium has a plugin that lets you control a Telescope. Stellarium would send commands over the network to 'node-telescope-server' that was listening on the Raspberry Pi. The commands would be relayed to the Nexstar from the Raspberry Pi.


Although I'm using a Raspberry Pi, the node-telescope-server can be installed on a beagle board too. Also Stellarium is available for Mac, Windows and Linux so I'm not locked down to using my Macbook.

Preparing the Raspberry Pi

The Raspberry Pi is using this Raspbian OS build: 2013-09-25-wheezy-raspbian.zip. You can download it from here: http://www.raspberrypi.org/downloads

There are tons of references online on how to use the image file. I used Win32DiskImager to lay the image on a 4GB SD card.

These are the configuration options I selected on the first boot of the Raspberry Pi:

  1. expand_rootfs – select expand_rootfs to expand the root partition to fill out the whole SD card
  2. memory_split – the minimum (16mb) - I don't intend to start any intensive graphical tasks.
  3. change_pass – replace the default password
  4. ssh – enable the ssh server, so that I can use ssh to log in from my laptop
  5. keyboard, timezone and locale - update these

To change these settings in the future use: sudo raspi-config

Reboot. Connect ethernet.

Installing Node

The node-telescope-server installation kept failing. I realized that I would manually need to upgrade the nodejs version.


  1. Create a node directory under the /opt directory for node: 
    • sudo mkdir /opt/node
  2. Download the latest version of node for raspberry pi (arm-pi): 
    • wget http://nodejs.org/dist/v0.10.21/node-v0.10.21-linux-arm-pi.tar.gz
  3. Decompress file: 
    • tar xvzf node-v0.10.21-linux-arm-pi.tar.gz
  4. Copy the contents of the decompressed directory to the node directory we created earlier: 
    • sudo cp -r node-v0.10.21-linux-arm-pi/* /opt/node
  5. Create a symbolic link to both node and npm in /usr/local/bin:
    • sudo ln -s /opt/node/bin/node /usr/local/bin/node
    • sudo ln -s /opt/node/bin/npm /usr/local/bin/npm
  6. Check the version of node:
    • pi@raspberrypi ~ $ node -v
    • pi@raspberrypi ~ $ npm -v

Installing node-telescope-server

This is the home of node-telescope-server: https://github.com/fcsonline/node-telescope-server

Install it: sudo npm install node-telescope-server -g
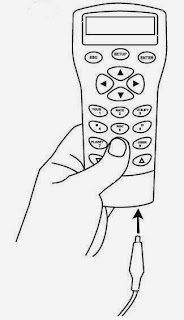
Connect your USB to RS232 Dongle to the Raspberry Pi and the handcontroller of the telescope.

Now lets figure out which terminal node the USB device is connected to

pi@celestron ~ $ lsusb
Bus 001 Device 002: ID 0424:9512 Standard Microsystems Corp.
Bus 001 Device 001: ID 1d6b:0002 Linux Foundation 2.0 root hub
Bus 001 Device 003: ID 0424:ec00 Standard Microsystems Corp.
Bus 001 Device 004: ID 0557:2008 ATEN International Co., Ltd UC-232A Serial Port [pl2303]

pi@celestron ~ $sudo modprobe usbserial vendor=0x0557 product=0x2008

pi@celestron ~ $dmesg
[   14.191324] USB Serial support registered for pl2303
[   14.316493] pl2303 1-1.2:1.0: pl2303 converter detected
[   14.395813] usb 1-1.2: pl2303 converter now attached to ttyUSB0

Ok, so its connected to ttyUSB0. Lets start node-telescope-server and point it to that serial node.

pi@celestron ~ $ nts -s stellarium -p 5000 -t nexstar -i /dev/ttyUSB0
Remote stellarium control server running at port 5000 to a nexstar telescope

Setup Stellarium

Download and install Stellarium on your remote machine. http://www.stellarium.org/

Open Stellarium and press Ctrl+0 (Command+0) or go to the telescopes window. Add a new telescope and choose the External software or remote computer. 

Choose a name for your telescope, like "NodeJS-RaspberryPI". Then specify the ip assigned to the RaspberryPI and the port listening by nts instance, in my case 192.168.1.15 and 5000. Save the telescope configuration.

The last step is to click on connect button and the status label should change to "Connected".

Finally you have the Stellarium connected to your telescope!

Choose the desired object and pres the Ctrl+1 to slew the scope to your target.

Ta-Da!

Note: I keep hitting the slew limits on the Scope after a few wild slews. I have yet to investigate the settings on the scope - some day...

References:

http://blog.rueedlinger.ch/2013/03/raspberry-pi-and-nodejs-basic-setup/
http://doctorbin.tumblr.com/post/53991508909/how-to-install-the-latest-version-of-nodejs-npm-and
https://github.com/fcsonline/node-telescope-server
http://nodejs.org/dist/v0.10.21/

Roadmap to the Universe - Part I

We just bought a Celestron Nexstar SE6 telescope along with the Eyepiece Kit and Power Tank. 

The Nexstar is a go-to scope. That means its computerized and you can use the inbuilt hand controller to tell the scope where to point to. This sounds quite cool but the interface is limited to a small LCD display with brief information. As a beginner I don't know where constellations are in the sky and I obviously haven't memorized the Messier (M) numbers. 

I did some digging around on how I could improve my setup. I found tons of upgrades and options. There is an insane array of gadgets you can buy for your scope and they all add up quite quickly price-wise. I realized that I would need to enter this arena carefully! I decided to use things that I have and keep costs to a minimum until I can justify a larger purchase. 

I laid my plan out and decided to work on it in increments. 

The Grand Plan is broken down into 3 phases:
  1. Control - gain remote control of the scope from a laptop using Stellarium
  2. Photography - connect a DLSR (Nikon D60) to the scope and gain remote control of it from the laptop 
  3. Video - gain remote control of a webcam from a laptop

And the Grand Plan..


Stay tuned for the next steps

Portable Speakers

So I went on a Camping trip with Lendl. We wanted music but neither of us had portable speakers. I kept thinking about the old Sony MPS 60 portabl speakers that we had both bought on sale a many years ago for our Sony Walkman phones.


After a little googling and some help from a colleague I now have a cool portable speaker set perfect for backpacking.


The speakers have a great little amp in the connector. I connected a USB plug to power the amp. I have an old portable battery that has a USB outlet perfect for this purpose. And the audio is over a regular ole headphone jack.

Random Woodwork

I made the coffee table.. Drake made the mess!


Drake and his buddy Thor

Randa wanted a planter in the backyard

Voilia!

Ikea? Bah!..

I've got way too many gadgets and dev boards and other crap that litters my computer table. I needed a big and long table. I couldn't find any at a thrift store and I didn't want to drop a wad of cash so I made my own.


Meet Wilson...

Made this a year ago as a birthday gift for my buddy. Pallavi. She named him Wilson. He now lives on her desk at Blackberry, Mississauga.


Convert a Router to a Switch

I have an Asus RT-N16 running Tomato in my basement. The signal strength outside the house is quite poor.
Also I do a lot of my tinkering with dev boards upstairs in my study. A lot of the dev board use ethernet and not wifi. To that end I decided to re-purpose an old Dlink WBR-1310 router as a switch and wifi range extender.

It took me a few tries to get it right! On the Dlink:

  1. Disable DHCP
  2. Disable UPnP
  3. Disable Gaming Mode 
  4. Change Dlink's IP to be OUTSIDE the DHCP range of the Asus Router. This is important. My Asus router was at 192.168.100.1 and was handing out IP's from 100-129 so I set my Dlink IP to be 192.168.100.200.
  5. Connect ethernet cable from Asus LAN port to Dlink LAN port. Nothing is connected to the Dlink WAN port
  6. Setup Wifi with new SSID and password


The DLink is not Gigabit like the Asus but that's ok since I'll be using the dlink for connecting my dev board and for browsing over a table or phone while I'm sitting outside at the pool. My NAS and HTPC are hardwired into the gigabit Asus.


ZFS Health Check and Email Notification

A simple cron script to monitor the health of a ZFS pool and email you if there are any problems. Tested on Ubuntu 12.04: (Taken from http://zfsguru.com/forum/zfsgurudevelopment/269)
#!/bin/bash
EMAIL_ADD=email@address.com

zpool status -x | grep 'all pools are healthy'

if [ $? -ne 0 ]; then
        /bin/date > /tmp/zfs.stat
        echo >> /tmp/zfs.stat
        /bin/hostname >> /tmp/zfs.stat
        echo >> /tmp/zfs.stat
        /sbin/zpool status -x >> /tmp/zfs.stat
        cat /tmp/zfs.stat | /bin/mail -s "Disk failure in server : `hostname`" $EMAIL_ADD
fi

Subversion: enable auto-props

Subversion keywords are u great to auto update the headers in you code files.

Subversion has the ability to substitute keywords—pieces of useful, dynamic information about a versioned file—into the contents of the file itself. Keywords generally provide information about the last modification made to the file. Because this information changes each time the file changes, and more importantly, just after the file changes, it is a hassle for any process except the version control system to keep the data completely up to date. Left to human authors, the information would inevitably grow stale.
http://svnbook.red-bean.com/en/1.7/svn.advanced.props.special.keywords.html

How to setup Automatic property setting

In ~/.subversion/config, un-comment the following line:
enable-auto-props = yes

And add the following to the [auto-props] section:
*.h = svn:keywords=Author Date Id Rev URL
*.c = svn:keywords=Author Date Id Rev URL
*.py = svn:keywords=Author Date Id Rev URL
*.java = svn:keywords=Author Date Id Rev URL
Makefile = svn:keywords=Author Date Id Rev URL
*.mk = svn:keywords=Author Date Id Rev URL

If you are using TortiseSVN the General page of TortoiseSVN's settings dialog has an edit button to take you there directly.

Creating Virtual Serial Ports in Ubuntu

  1. Install
    sudo apt-get install socat
    
  2. Create two virtual serial ports
    $ socat -d -d pty,raw,echo=0 pty,raw,echo=0
    2012/05/31 12:41:56 socat[28162] N PTY is /dev/pts/6
    2012/05/31 12:41:56 socat[28162] N PTY is /dev/pts/7
    2012/05/31 12:41:56 socat[28162] N starting data transfer loop with FDs [3,3] and [5,5]
    
To Test, open two terminals
  • Terminal 1:
    cat < /dev/pts/6
    
  • Terminal 2
    echo "hello" > /dev/pts/7
    
You should see hello echo-ed on terminal 1